
Super Easy Sparkling Gourds & Pumpkins

I love anything sparkly, so naturally, I had to make my pumpkins and gourds shine too! Honestly, it probably took me less time to create these pumpkins than it did to upload the pictures and post this. (It took me under an hour to create the pumpkins.) I discovered these ivory pumpkins and gourds at a local pumpkin patch called Sunnyside Gardens. I then bought some glue specifically designed for glitter (with an attached brush) and a big container of silver sparkles from A.C. Moore. I know the pumpkins probably won't keep, but I'm hoping the sparkly gourds will keep until Thanksgiving!

I saw a picture of a polka dot pumpkin on Pinterest and I fell in love with the idea. One problem...I am not good at creating perfectly round circles. How did I make them on this polka dot pumpkin? With the help of something we have a lot of...old wine corks :) I painted the bottom of the wine corks with the glue and then applied the corks to the pumpkin. I sprinkled glitter on the circles and voila! I did make several mistakes, so I had a wet paper towel handy to wipe excess glue off quickly. I applied glue to the natural lines on the small pumpkins below to create the "striped" effect you see. The striped pumpkins and gourds are my favorite!


Newspaper is a must if you do this project! (Actually a large garbage bag might work better so you can fold it in on itself after and collect all the glitter.) I glittered these pumpkins on my deck. After I cleaned up, my daughter said, "Uh oh!" because I left quite a bit of glitter behind. I will admit, I am not the neatest person when I do a craft project but I have a lot of fun! If you make these, I hope you enjoy them as much as I have!

Sweet on Style DIY Friday
An Embellished Blush Pink Hat
Ironically, today couldn't be a more appropriate day for this DIY project. Snowflakes are slowly and softly falling outside in a winter wonderland. However, I am dreaming of spring! The blush pink hue of this hat reminds me of spring - particularly this spring. The shy, demure shade of blush pink is huge for spring. Embellishments will also remain popular through Fall 2014. Tory Burch's Fall 2014 line, which debuted this week in NYC, featured many elegantly embellished tops.
This embellished hat was very easy to create. I bought the hat at American Eagle Outfitters but I thought it needed something more. First of all, it was far too large without folding it over. Secondly, I was longing for an embellished hat anyway. I found the stones at Hobby Lobby. I used four medium-size rectangular stones and one small stone for the center. I placed the stones in my chosen design first and then took note of the "lines" on the hat where I would need to start and end for each stone. I had to re-thread one of the stones a few times to get it in place, but it wasn't too difficult. With this project behind me, I'm now hoping to embellish something more challenging. I'm loving the elegance of a blush pink or black embellished top!


Sweet on Style DIY
My Favorite Food Blogger Recipes
I confess that I love to eat, but I do not love to cook. My husband is an excellent cook. One of my New Year's resolutions is to sharpen my culinary skills (or start them). I have been searching for healthy recipes on Pinterest every day and these are some of my favorites! I hope you enjoy them as much as I have! Here are the recipe links you'll find below:
Autumn Arugula Salad / Slow Cooker Quinoa, Chicken & Kale Soup / Easy Garlic Chicken

From the Food Blog:
This recipe is exceptional. I've made it three times now and it's healthy and it tastes incredible. The caramelized squash pieces are out of this world! It's easy to make and the presentation is beautiful. Here are some of the pictures of my finished product & process:
 |
| The caramelized squash pieces are, in my opinion, the highlight of this dish. |
 |
| I added garlic chicken to the salad the first time I made it. The recipe is below! |

 |
| The secret behind the caramelized squash is the brown sugar in the recipe. Once finished, it's soft and sweet! |
 |
| Delicious! |
from the Food Blog:
My pictures of this recipe don't do it justice. It is amazing! In its raw form, I've never
been a huge fan of kale. I find it bitter and unexciting. However, Charlotte loves to eat
it and it's great for you. So, when I saw my friend Brittany post this recipe on Pinterest, I just had to try it. It's easy to make (slow cooker!) and the results are excellent. I ate half of the recipe and froze the other half. I can't wait to eat it again! And the real test? Charlotte loved it! She ate every bit I gave to her.


Charlotte loves lots of leafy green vegetables and fruits. She
actually inspired us to eat more raw foods. When I gave her canned vegetables one day,
she pushed them aside and wouldn't eat them. Once I tasted them, I knew exactly why! I am always looking for great recipes that use fresh vegetables and fruits.

Bon Appetit!
Sweet on Style's DIY Friday
Headband Tutorial
Spring Trend 2014 / Hair Adornments
Sparkly, braided and beaded headbands grace the shelves of many stores right now from Saks Fifth Avenue to Bloomingdale's to Target. The feeling of sweeping your hair off your face is a great one! They're a great gift to yourself or someone else. Headbands have been in style for the last few years. This spring, even more hair adornments from barrettes to sweet, delicate bobby pins will hit the shelves. So, this is just the start and you'll see more to come like this on DIY Friday!


Not Difficult for Even the Least Experienced (Me!)
I am the daughter of a talented seamstress; however, the last time I picked up a needle and thread before this (aside from sewing a button) was in middle school when I begrudgingly made a required gym bag. I am working to change this because I love the exhilaration of creating something. The headbands took me about an hour each to create while watching Downton Abbey on the side. I did have to play around with them a little bit to get them just right, but, again, I'm happy with how they came out on my first try.

Headbands for Migraine Sufferers
In all honesty, my sister, Anne, came up with the idea to make these headbands. We were at Hobby Lobby and saw all of the beautiful ribbons and beaded pieces. A lightbulb went off though when I thought of how these might actually really work for me. I am a chronic migraine sufferer. It means painful headaches and a very rare chance to wear headbands. For some reason, average-fitting headbands can trigger the start of a migraine. I remember being nervous before my wedding that wearing the gorgeous veil I'd selected would trigger a horrible migraine. Fortunately, it didn't! In any event, I usually avoid headbands. But now, these are perfect because I can custom make them loose enough to avoid discomfort!

Here is what you need to get started:
1) Elastic (Black or brown or light to match your hair) The width is up to you. I used 1/4 inch but I would recommend 1/8 inch if you want it to be even less noticeable)
2) Your Choice of Ribbon, Beaded Material or Accent Piece
(I bought a half a yard to be safe)
3) Needle (Use a thick needle like an embroidery needle. If you use a regular needle, it will likely split in half as it did for me!)
4) Thread to Match Your Elastic
5) Scissors
6) Measuring Tape or Ruler
7) Safety Pins (To size headband for fit)

Step One:
Take the ribbon or beading you are going to use for the main part of the headband and measure it around your head. Really take the time to figure out what would be most comfortable for you. Do you want the headband closer to your hairline or back farther? For the second part of this - I am daring (and was very careful) and put a needle through the end of it. I wouldn't recommend this - use a safety pin instead. I wanted to assess just how comfortable the size would be without holding it with my fingers.

Step Two:
(If you are using the black or brown elastic as the actual headband and adding an accent piece, disregard this step.)
Subtract 4 inches from the measurement of your headband ribbon and cut it. This is because you will hand-sew elastic on the bottom of the headband (as it will eventually look below). You'll want to cut 5 inches of elastic - 4 inches of elastic will bridge the gap. The rest is overlap to sew the pieces together. (You can use more or less elastic on the bottom if you want. It's all about what is most comfortable to you. Most headbands have 7 or 8 inches of elastic, but I prefer far less elastic.)


Step Three:
You can test out the fit again if you like. I again used needles to hold the pieces together and tried it on my head. Again, I recommend safety pins :) I don't know what I was thinking! Then, I started hand-sewing each side together. I made stitches the width of about 1/4 inch. I probably did about 15 to 20 stitches to make sure it held in place. (If you use something beaded like the orange beaded headband below, you will have to sew in between the beads to adhere it in place.)


This is your last step unless you have an accent piece to hand-sew to the top of the headband!
Step Four:
(For Adding an Accent Piece)
Step Four:
(For Adding an Accent Piece)


I stitched two rows of stitches to make sure it was secure enough as you can see below.


sew onto. That made it SO much easier. If I had to sew the entire piece onto a single piece of felt it would have been much more difficult.

I hand-sewed it in two main places (left and right). Then, I made some small stitches on the very end of each side so the accent piece will sit flat instead of stick up at the ends when I wear it.

Congratulations! Hopefully you have a beautiful new headband to show off! If you have any questions at all about how I made these headbands, feel free to e-mail me at sweetonstylemary@gmail.com.
Sweet on Style's DIY Friday
Sparkling Winter Centerpiece
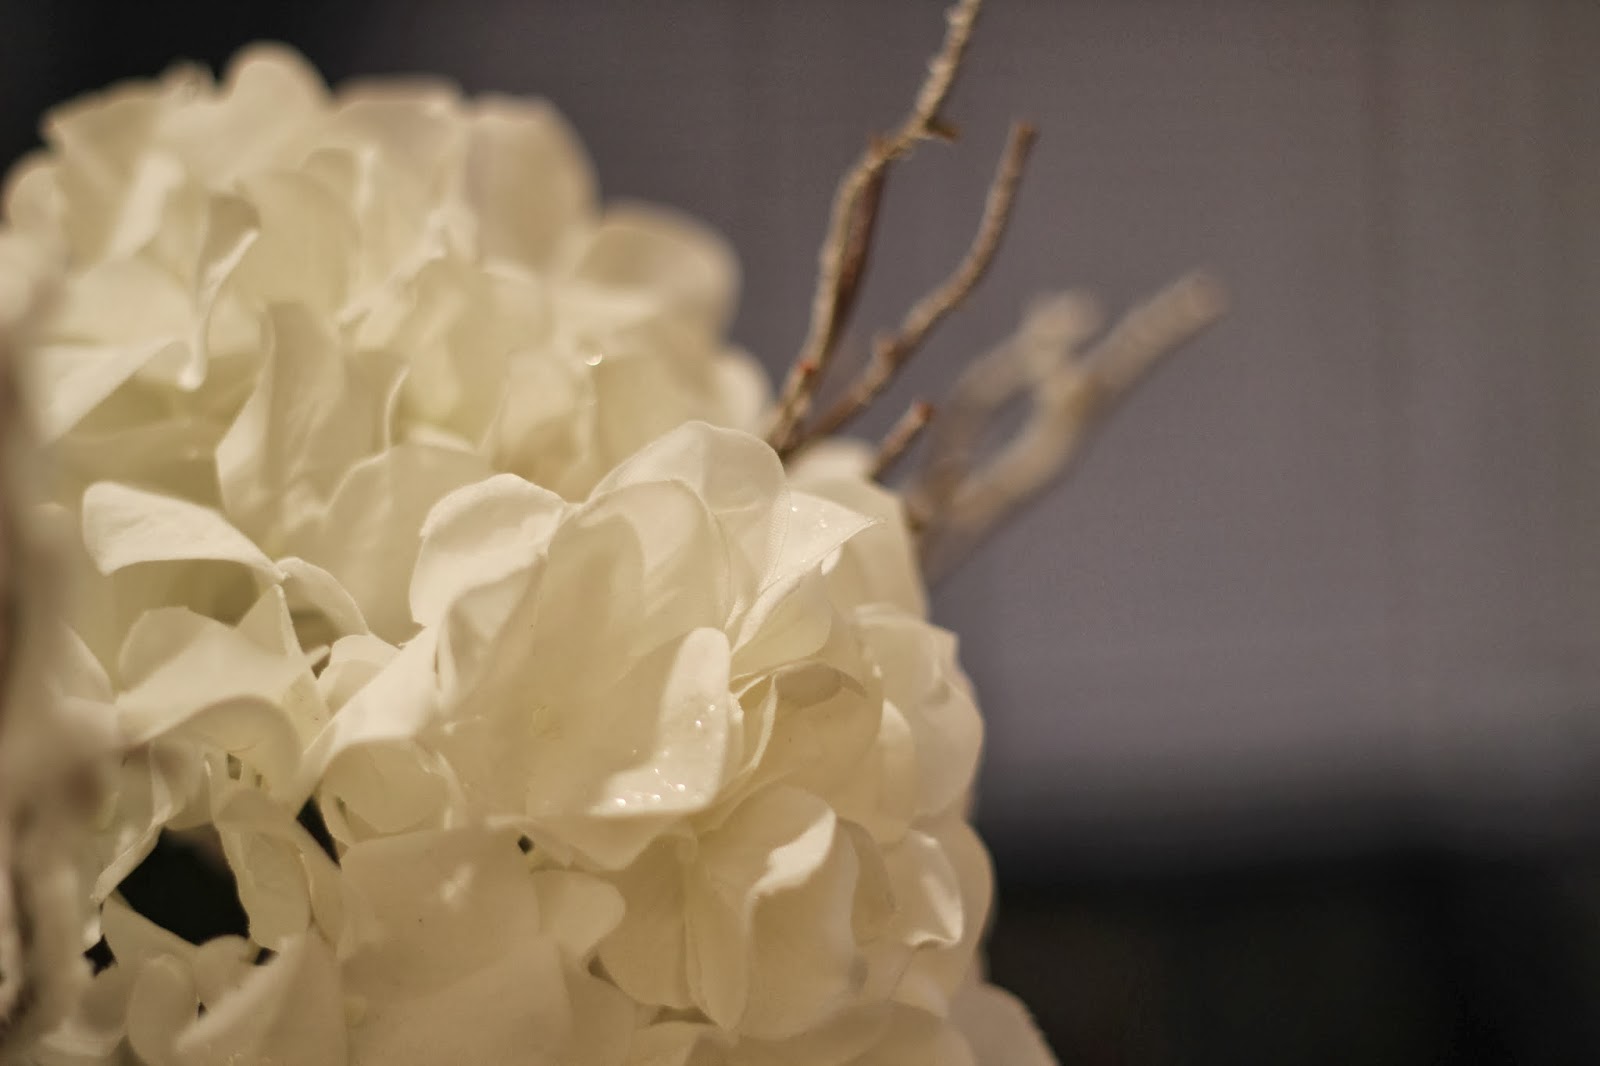
I was taking all of the ornaments and glittered flowers off our tree when I had
an idea to reuse them. I think you can likely guess from this blog, I like to find multiple uses for everything! I take great pride and time (ask my husband, ha!) in the pieces I select for my wardrobe and home. So, although I'm sad to see the holidays over, I"m thrilled my glittered flowers can stay around for the winter months.
 |
| I found these glittered flowers and "snowy tree branches" at Michael's this holiday season. I already had the vase (we used it as part of our wedding) and it was from T.J. Maxx. I used two glittered ivory poinsettias and three white hydrangeas. I used nearly a full stem of the "snowy tree branches." I started by putting the hydrangeas in the vase, then alternated and filled in with the poinsettias. I then added the branches and played around for a while putting them in different places to see what looked best. |
 |
| To place the tree branches, I put them in the center of each flower. I used seven small stems. (I cut the original stems in half.) |
 |
| I think the stems could be a lot cleaner. Next time, I am going to buy more white rocks and go about a third of the way up the vase. So, if you try this at home, here's another tip! |


 |
| Here is our Christmas tree! Next year, I'd like to add large netted silver sparkle ribbon to add more depth. This year, I ran out of time! |

DIY Eco-Friendly Holiday Gift Boxes
I absolutely love the holiday season because I love giving gifts. This year, I am trying to be more eco-friendly by using reusable boxes and bags. I bought these reusable boxes last year on clearance at Target and picked up a few items to personalize them.


 |
| I found this elegant little frame at Hobby Lobby and, of course, had to add Charlotte's picture to it. |

 |
| I bought this letter A at Restoration Hardware last year and I love it! I know my sister, Anne, will love it too. |
 |
| This is actually a wedding sash I bought at Michael's on sale. I added the rhinestones to it for a bit more sparkle. |

 |
| These flowers are also part of a sash I bought on sale at Michael's. They were so inexpensive, I bought a few of them. This one will be used on this box for Christmas. The other may be used as a sash for one of my daughter's dresses eventually. |

